I have recently tried to make the documentation menus on the Simplify Your Web
website a little more 'user friendly'.
One element that was particularly missing was the possibility to see sub-menu items of parent menu items without the need to refresh the pages. At the same time, I wanted to make sure visitors of the site were aware there was more to see under certain items...
This tutorial will show you how I proceeded and how you can do it too.
Step 1 - Create a menu with several sub-menu levels
To learn how to create menu items, please check the Joomla documentation.
Step 2 - Create an instance of the menu
module
Go to Extensions -> Modules -> New
Step 3 - Set a few key parameters
Step 3a Select the menu that you want to work on.
Step 3b Show the sub-menu items.
Step 3c Add a class suffix.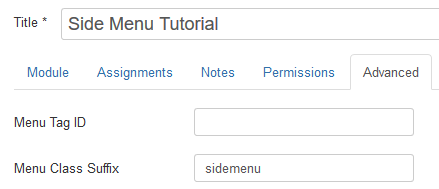
Warning Do not forget to add an empty space before the sidemenu class.
At this point, on the public side of your site, you should see something like: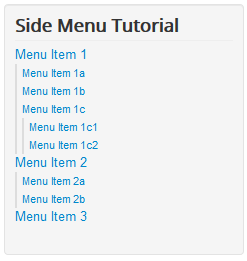
Step 4 - Download and install Custom Source Easy
This step is not necessary if you know where you can add script and styles to your template. By using Custom Source Easy
, you will be able to target areas of your site with the code additions (and not 'bloat' your pages where the code is unnecessary) and add this code very easily.
Step 4a Download Custom Source Easy
.
Step 4b Install.
Step 4c Create an instance of the Custom Source Easy
module. This module will be invisible to the visitors of the site.
Step 4d Set key parameters: hide the title, set the position to anything ('debug' is a good candidate) and publish.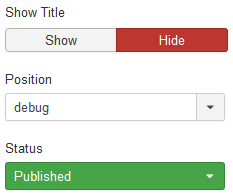
Step 4c Assign the module instance to the pages where the menu will show.
Step 5 - Add the jQuery script
The script adds place holders for the hooks that will be clickable in the menu, on-the-fly, whenever a menu item has children. It also adds clickable events to those hooks.
Step 5a Add the following script in the Head tab of the module, in the jQuery section, under Custom jQuery.
$('.sidemenu').find('.deeper').prepend('<span class="expcol"></span>');
$('.sidemenu').find('.deeper .expcol').on('click', function() {
    if ($(this).parent().hasClass('expanded')) {
        $(this).parent().removeClass('expanded');
    } else {
        $(this).parent().addClass('expanded');
    }
});
Note If you are not using Custom Source Easy
, you need to make sure jQuery is loaded on your page and that you englobe the previous script into:
(function($){
    jQuery(document).ready(function($) {

    });
})(jQuery);
Step 5b Make sure the script works properly by inspecting (right-click in the browser) one of the top-level menu items (one that has children). Particularly, you need to see the expcol class.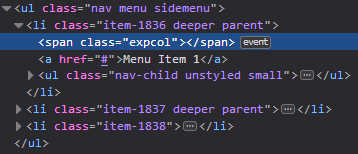
Step 6 - Skin the hooks
Add styles for the hooks to the CSS section of Custom Source Easy
, under Custom CSS.
ul.sidemenu .expcol {
    font-size: 1.8em;
    color: #002b41;
    display: inline-block;
    position: absolute;
    top: 0;
}

ul.sidemenu .expcol:hover {
    cursor: pointer;
    color: #3b589e;
}

ul.sidemenu .active .expcol:hover {
    cursor: auto;
    color: #002b41;
}

ul.sidemenu .expcol:before {
    content: "+";
}

ul.sidemenu .active > .expcol:before,
ul.sidemenu .expanded > .expcol:before {
    content: "-";
    padding-left: 3px;
}

ul.sidemenu .expcol + a {
    margin-left: 20px;
}

ul.sidemenu .deeper {
    position: relative; /* hooks are absolute-positionned, therefore the parent element must be relative */
}
On the front end of the site, you should see: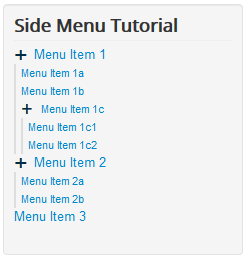
Step 7 - Show/hide the children menu items
Add the following styles:
[code]ul.sidemenu > .deeper ul {
    max-height: 0;
    overflow: hidden;
}

ul.sidemenu .deeper.expanded > ul,
ul.sidemenu .active.deeper > ul {
    max-height: 700px; /* the number is arbitrary, it just needs one */
}
On the front end of the site, you will be able to show/hide the menu item children: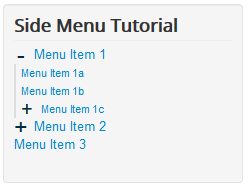
Step 8 - Pretty-up the output
Step 8a Move the children over to the right.
ul.sidemenu li ul {
    margin: 3px 0 0 30px;
}
Step 8b Override the template's CSS.
#aside ul.nav.sidemenu .nav-child {
    border-left: none;
    padding-left: 0;
}
On the front end of the site, you should finally see something like: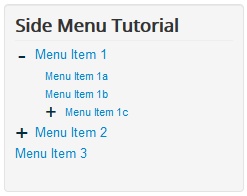
Step 9 Extra: add animations (smooth sliding on click)
To ul.sidemenu > .deeper ul add the following properties:
-webkit-transition: all .5s ease-in-out;
     -o-transition: all .5s ease-in-out;
    transition: all .5s ease-in-out;